How to Add a Custom Application to Umbraco 4.8
The only problem with Umbraco is that the documentation isn't very complete. Fortunately Umbraco users and developers have written helpful articles. We were using a version of Umbraco after 4.8, so to create a new application we needed to add a new code file to create the new link in the management console and another one to tell Umbraco what to display when you click on it.
Sorry to interrupt…
If you like what you've read so far, join us on LinkedIn to talk all things digital product development with our team of experts.
The Application.cs file doesn't contain any code – it just needs to implement the interface IApplication and have a set of attributes to tell Umbraco what to call the new application, where to find its icon:
[Application("prs", "PRS Application", "traySprites_PRS.png", 7)] public class PrsApplication : IApplication { }
The Tree.cs code file is then run when the application is clicked on to render the navigation tree, and to tell Umbraco what to do when the tree nodes are clicked on - Umbraco uses the application name specified in both to link them together:
[Tree("prs", "PRS Tree", "Pure Resourcing Solutions", "traySprites_PRS.png")] public class PrsTree : BaseTree { ¬¬public PrsTree(string application) : base(application) { } ¬¬ ¬¬protected override void CreateRootNode(ref XmlTreeNode rootNode) ¬¬{ ¬¬¬¬rootNode.Icon = FolderIcon; ¬¬¬¬rootNode.OpenIcon = FolderIconOpen; ¬¬¬¬rootNode.NodeID = "init"; ¬¬} ¬¬ ¬¬public override void Render(ref XmlTree tree) ¬¬{ ¬¬¬¬string STAT_ID = "Stats"; ¬¬¬¬ ¬¬¬¬if (this.NodeKey == STAT_ID) // nodeKey is the parent node ID ¬¬¬¬{ ¬¬¬¬¬¬foreach (var stat in Reports.StatType) ¬¬¬¬¬¬{ ¬¬¬¬¬¬¬¬// Create tree node to view this stat ¬¬¬¬¬¬¬¬var node = XmlTreeNode.Create(this); ¬¬¬¬¬¬¬¬node.Text = stat.Key; ¬¬¬¬¬¬¬¬node.NodeID = stat.Key; ¬¬¬¬¬¬¬¬node.Icon = "docPic.gif"; ¬¬¬¬¬¬¬¬node.Action = "javascript:openStat(" + stat.Value + ")"; ¬¬¬¬¬¬¬¬ ¬¬¬¬¬¬¬¬// Add the node to the tree ¬¬¬¬¬¬¬¬tree.Add(node); ¬¬¬¬¬¬} ¬¬¬¬} ¬¬¬¬ ¬¬¬¬else // create parent ¬¬¬¬{ ¬¬¬¬¬¬var stats = XmlTreeNode.Create(this); ¬¬¬¬¬¬stats.Text = "Stats"; ¬¬¬¬¬¬stats.NodeID = STAT_ID; ¬¬¬¬¬¬stats.Icon = FolderIcon; ¬¬¬¬¬¬stats.OpenIcon = FolderIconOpen; ¬¬¬¬¬¬ ¬¬¬¬¬¬// marks this as a node with children ¬¬¬¬¬¬stats.Source = this.GetTreeServiceUrl("Stats"); ¬¬¬¬¬¬ ¬¬¬¬¬¬// Add the node to the tree ¬¬¬¬¬¬tree.Add(stats); ¬¬¬¬} ¬¬} ¬¬ ¬¬public override void RenderJS(ref StringBuilder Javascript) ¬¬{ ¬¬¬¬Javascript.Append(@" ¬¬¬¬function openStat(statId) { ¬¬¬¬ parent.right.document.location.href = 'prs/stats.aspx?StatTypeID=' + statId; ¬¬¬¬}"); ¬¬} }
Once these files are added to the Umbraco site (and it is restarted), the configuration files are updated automatically based on the attributes and the application will appear inside the Umbraco administration interface (once you remember to give your user permission to view the application, that is!).
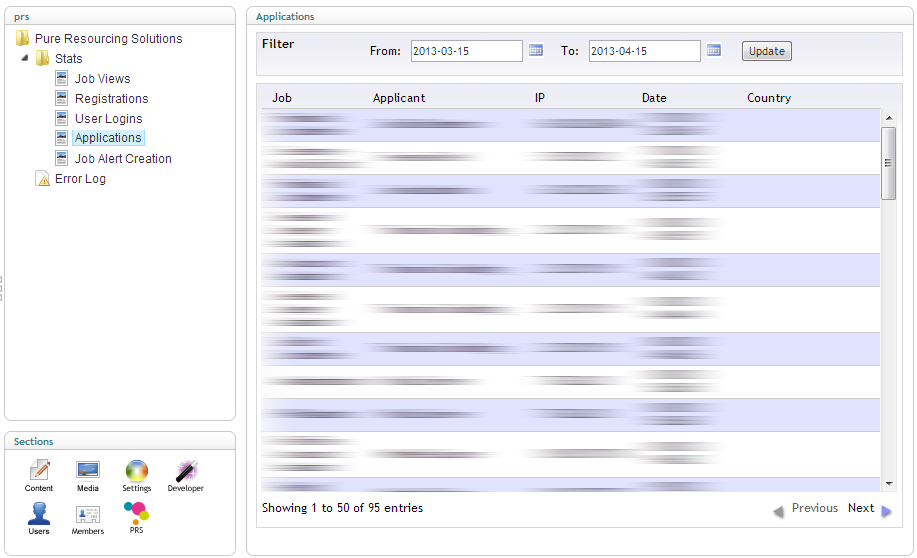
The new application looks the same as the built-in Umbraco management applications for page content, layout templates and user management, and uses the same tree-style navigation system, so there is only one type of interface for users to learn. Because the administration pages we were replacing deal with displaying statistics, we used the jQuery.datatables library to give us paging, asynchronous loading and theme support so they are fast to load and use and pretty to look at.
Ready to solve your problems?
We'll help meet the challenges facing your growing business. Get in touch and tell us what you need, the team can't wait to hear from you.


